Creating an Activity
Overview
Activities can be added to sessions in the Learnig Plan against a course. These can be created and added to any learner registered to that course and can help structire your provision/ assessment of a course/ standard.
Preparation
Know the sequence that you would like activities to be completed in.
Know the mappings that could be applied for each activity.
User Restrictions
Users will need the following permissions to be able to view and use the above pages: -
- Master Administrator
- Assessor (Assessors cannot delete, edit or upload files against activities created by other users.)
DETAILS
Select the Activity Library tab to access this page.
Start typing the name of the course that you want to find to filter the drop-down list in the Course field to your desired course.
Once you have located the Course in the drop-down list, click on the name of the Course to select it.
This will automatically display any existing activities for that Course in the table underneath. If you have SmartVLE enabled on your site, any activities that are linked to SmartVLE will display the logo next to the Activity name.
ADDING AN ACTIVITY
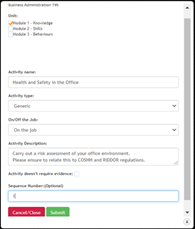
Select the green Create Activity button to create a new activity. This will open a modal displaying the name of the course that you are creating the Activity for. Enter the following details for your Activity: -
Unit Select the checkbox for the module(s) that this Activity relates to.
Activity Name Give your Activity a unique name for easy identification.
Activity Type Select from the drop-down list: -
- Generic
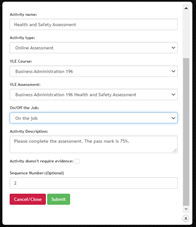
- Online Assessment (SmartVLE enabled clients only)
If Online Assessment is selected the user must select the VLE Course that the assessment is located in and the name of the VLE Assessment from the drop-down lists that appear.
On/Off the Job Select from the options available in the drop-down list: -
- On the job
- Off the job (time entered in activity details will go towards Off the job calculations)
- Not Applicable
Activity Description Enter a description of the Activity that you want the Learner to complete. These will appear as instructions to the Learner so give as much detail as possible.
Activity doesn’t require evidence. Select this checkbox if you do not require evidence to be uploaded to the Evidence Library as part of the Activity.
Sequence Number (Optional) This is an optional field which allows you to enter the sequence number for this Activity, this is particularly useful if you are building up a scheme of work for your course and you would like the activities to be completed in a specific order.
Once you are happy with the details select Submit to save the activity.
Below you can see examples of Generic and Online Assessment Activity types.
Generic Activity
Online Activity
Once created, the Activities will appear in the table for that Course. Any Assessor will be able to assign that activity to a Learner registered to the course via the Sessions in the Learning Plan.
EDITING AN ACTIVITY
If you are logged in as an Assessor you will only see action buttons for Activities that you have created. If you are logged in as a Master Administrator, you will be able to carry out actions for any Activities.

To edit an Activity, select the pencil icon from the available Actions in the row for that Activity.
This will open the modal as described in Adding an Activity. Make any changes as necessary and select Submit to save your changes.
DELETING AN ACTIVITY
To delete an Activity, select the delete icon from the available Actions in the row for that Activity.
The warning message below will display to confirm that you want to delete the Activity. Select OK to delete or Cancel to stop that action from being performed.
OPTIONAL PC MAPPINGS
To apply optional PC mappings to the activity, select the plus icon from the available Actions in the row for that Activity.
This will open a modal showing the To Do topics for the module that you selected under Units when you created the Activity.
Select Show to know and Show Range to show the full range of topics under that module.
Depending on the range that is covered by the activity, you can select Tick All to automatically tick all of the topics or select the relevant topic(s) that are covered by the Activity. To assist with this, if you mouseover the topic code, hover text will appear displaying a description of that individual topic. Once you are happy with your selection, select Submit.

When evidence is uploaded against that activity in the Learner’s Learning Plan, you can select the evidence to be included in the mapping and then select mark as completed using the Evidence link against that Activity in the session.
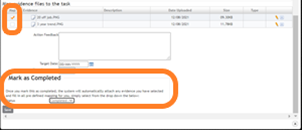
The pre-mapping will be applied in the Evidence Library for that piece of evidence.

UPLOADING FILES TO ACTIVITIES
To upload a file to the activity, select the green up arrow icon from the available Actions in the row for that Activity.
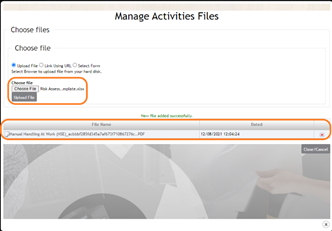
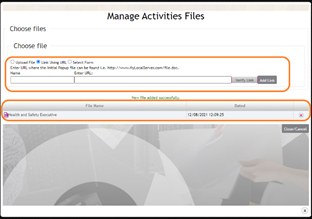
This will open the Manage Activities Files modal which has 3 options: -
Upload File Select the Choose File button to open File Explorer. Select the file you want to upload and select open. The name of the selected file will display next to the Choose File button. Select the Upload File button to upload that file to the Activity. Once uploaded, you will see a success message and the file name will appear in the table with the date and time of upload.
Link Using URL Enter a name for the URL you want to attach to the Activity and then enter the URL in the Enter URL field. Select Verify Link – if the URL has been entered correctly a new webpage will open taking you to the URL you have entered. Select Add Link, once linked, you will see a success message and the link name will appear in the table with the date and time of linking.
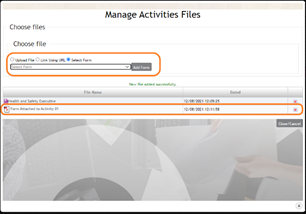
Select Form Select the form you want to link to the Activity from the drop-down list and then select Add Form. Once linked, you will see a success message and the form name will appear in the table with the date and time of linking.
Any file that has been uploaded to an activity can be deleted from the activity by selecting the green up arrow icon from the available Actions in the row for that Activity and selecting the red cross next to the file you want to delete. A warning message will appear. To confirm this action, you must type DELETE in the text box and select confirm.
Any files that have been attached to an Activity will appear in the Files column in the Session details for the Activity in the Learner’s Learning Plan.
